Battery switch on travel trailer function is crucial for managing your RV’s power. Understanding how to use it correctly ensures you have power when you need it, whether you’re hooked up to shore power or relying on your house batteries. This guide breaks down the functionality, troubleshooting, and safety aspects of your travel trailer’s battery switch, helping you become a confident RV owner.
We’ll cover different switch types, connection procedures, common problems, and safety precautions. Learn how to seamlessly switch between power sources, maintain your battery connections, and troubleshoot issues to keep your RV running smoothly. We’ll also explore how the battery switch interacts with other trailer systems, ensuring a comprehensive understanding of its role in your RV’s electrical system.
Understanding Battery Switch Functionality in Travel Trailers
Your travel trailer’s battery switch is a crucial component for managing power, preventing accidental drain, and ensuring you’re using the correct power source. Understanding how it works is key to maintaining your RV’s electrical system and avoiding costly repairs.Battery switches in travel trailers act as the central control for your trailer’s battery power. They allow you to disconnect your house batteries from the rest of the electrical system, preventing unwanted battery drain when the trailer is stored or not in use.
They also allow you to select between different power sources, like shore power or your generator.
Battery Switch Types
Travel trailers utilize various types of battery switches, each designed to manage different power configurations. A single battery switch is the simplest, connecting and disconnecting a single battery bank. Dual battery switches manage two separate battery banks, often used for larger trailers or those with dedicated starting and house batteries. Some more advanced systems incorporate switches that allow for combining battery banks for increased power, or isolating them for charging individually.
Typical Components of a Battery Switch System
A typical battery switch system includes the battery switch itself, a set of battery cables, and potentially a battery disconnect switch (separate from the main switch). The battery switch is usually located in a readily accessible location, often near the batteries or the main electrical panel. The battery cables connect the batteries to the switch, and from the switch to the trailer’s electrical system.
A separate disconnect switch provides an additional layer of safety, allowing you to completely isolate the batteries from the trailer’s system, even when the main battery switch is in the “on” position.
Operating a Battery Switch
Operating a battery switch is generally straightforward, but always refer to your specific model’s instructions for detailed guidance. The switch will usually have clearly marked positions such as “Off,” “Battery,” “Both,” or similar designations depending on the switch type.
- Identify the switch positions: Familiarize yourself with the markings on your battery switch to understand each position’s function.
- Turn the switch to the “Off” position: This completely disconnects the batteries from the trailer’s electrical system. This is crucial when storing your trailer for extended periods to prevent battery drain.
- Select the desired position: Once you are ready to use your trailer, switch to the appropriate position. “Battery” will typically power only the house batteries, while “Both” (if available) will combine house and starting batteries for increased power demands.
- Check your electrical system: After changing the switch position, verify that your appliances and lights are functioning correctly.
Remember to always exercise caution when working with electrical systems. If you are unsure about any aspect of your battery switch operation, consult a qualified RV technician.
Troubleshooting Common Battery Switch Issues: Battery Switch On Travel Trailer Function
Your travel trailer’s battery switch is a critical component, ensuring you have power when you need it. Problems with the switch can leave you stranded without lights, appliances, or even the ability to charge your batteries. Understanding common issues and how to troubleshoot them is essential for a smooth camping experience.
Common Battery Switch Problems and Their Causes
Battery switch problems usually manifest as either a complete lack of power or significantly reduced voltage. These issues can stem from several sources, including simple problems like blown fuses to more complex issues with the switch itself or even wiring problems. Identifying the root cause is key to a swift and effective repair.
Troubleshooting Steps for Battery Switch Issues, Battery switch on travel trailer function
Before diving into complex repairs, remember safety first! Always disconnect the negative battery cable before working on any electrical components in your travel trailer. This simple step can prevent serious injury.
| Symptom | Possible Cause 1 | Possible Cause 2 | Solution |
|---|---|---|---|
| No power to any 12V appliances | Blown fuse in the battery switch circuit | Faulty battery switch | Check and replace blown fuse. If the fuse blows again, inspect the switch for damage or internal shorts. Consider replacing the switch. |
| Low voltage at 12V outlets | Weak or discharged house battery | Loose or corroded battery connections | Check the battery voltage with a multimeter. Charge or replace the battery if necessary. Clean and tighten battery terminals. |
| Power only to some appliances | Wiring problem in the circuit | Faulty appliance | Trace the wiring from the battery switch to the affected appliance. Check for loose connections or damaged wiring. Test the appliance independently. |
| Intermittent power | Loose connection at the switch or battery terminals | Worn-out switch contacts | Tighten all connections. If the problem persists, consider replacing the switch. |
Troubleshooting Guide
A systematic approach can help you quickly identify the source of the problem. Follow these steps:
- Check the fuses: Inspect all fuses related to the battery switch. Replace any blown fuses with fuses of the same amperage rating. If a fuse blows immediately after replacement, there’s a short circuit somewhere in the system.
- Inspect the battery switch: Carefully examine the switch for any visible damage, loose connections, or corrosion. Clean any corroded terminals with a wire brush and baking soda solution.
- Test battery voltage: Use a multimeter to measure the voltage of your house battery. A low voltage reading indicates a weak or discharged battery that needs charging or replacement.
- Check battery connections: Ensure all battery terminals are clean, tight, and securely connected. Loose or corroded connections can significantly reduce voltage.
- Trace the wiring: If the problem is isolated to specific appliances, carefully trace the wiring from the battery switch to the appliance. Look for any loose connections, damaged insulation, or breaks in the wiring.
- Consider professional help: If you are unable to identify and resolve the problem after these steps, it’s best to consult a qualified RV technician.
Battery Switch and its Relation to other Trailer Systems
The battery switch isn’t just an on/off switch; it’s a crucial component that manages power flow within your travel trailer’s 12V system, influencing how your charging system works and how your appliances behave. Understanding its role is key to maintaining your trailer’s electrical health.The battery switch acts as a gatekeeper for the 12V power originating from your trailer batteries.
Its position directly impacts the charging process and the availability of power to your trailer’s 12V appliances.
So, you’re an audiophile who travels? Awesome! Planning your next trip? Check out this guide on creating the perfect audiophile travel setup for your tropical getaway. It’s all about packing light but smart, prioritizing sound quality. Then, if you’re heading for a more luxurious trip, consider the tips found in this other guide on audiophile travel setup for high-end accommodations.
Remember, even on the go, you deserve amazing sound!
Charging System Interaction
With the battery switch engaged (typically the “on” or “both” position), the charging system – whether it’s your tow vehicle’s charging system or a solar panel setup – can readily charge both your house batteries and your chassis battery (if your trailer has one). The power flows from the charger, through the switch, and into the battery banks. Conversely, with the switch off, the charging system will either not charge at all (depending on the system’s design) or only charge the chassis battery, leaving your house batteries isolated.
This isolation prevents unwanted battery drain when the trailer is not in use.
Power Flow Comparison: Switch Engaged vs. Disengaged
Switch Engaged: Power flows from the charging source (converter, alternator, solar panels) to the battery switch, then to both the house and chassis batteries (if present). The 12V appliances draw power directly from the house batteries.
Switch Disengaged: Power flow from the charging source is typically isolated from the house batteries. Only the chassis battery (if present) receives a charge. The house batteries are completely disconnected from the charging system and the 12V appliances. This prevents drain on the house batteries and is essential for long-term storage.
Effect on 12V Appliance Operation
The battery switch directly controls the power supply to your 12V appliances, such as lights, water pumps, and fans. When the switch is engaged, these appliances can draw power from the house batteries. If the switch is disengaged, these appliances will not function, as their power source is cut off. Remember, some trailers might have a separate switch for the chassis battery, allowing certain functions to remain operational even with the main battery switch off.
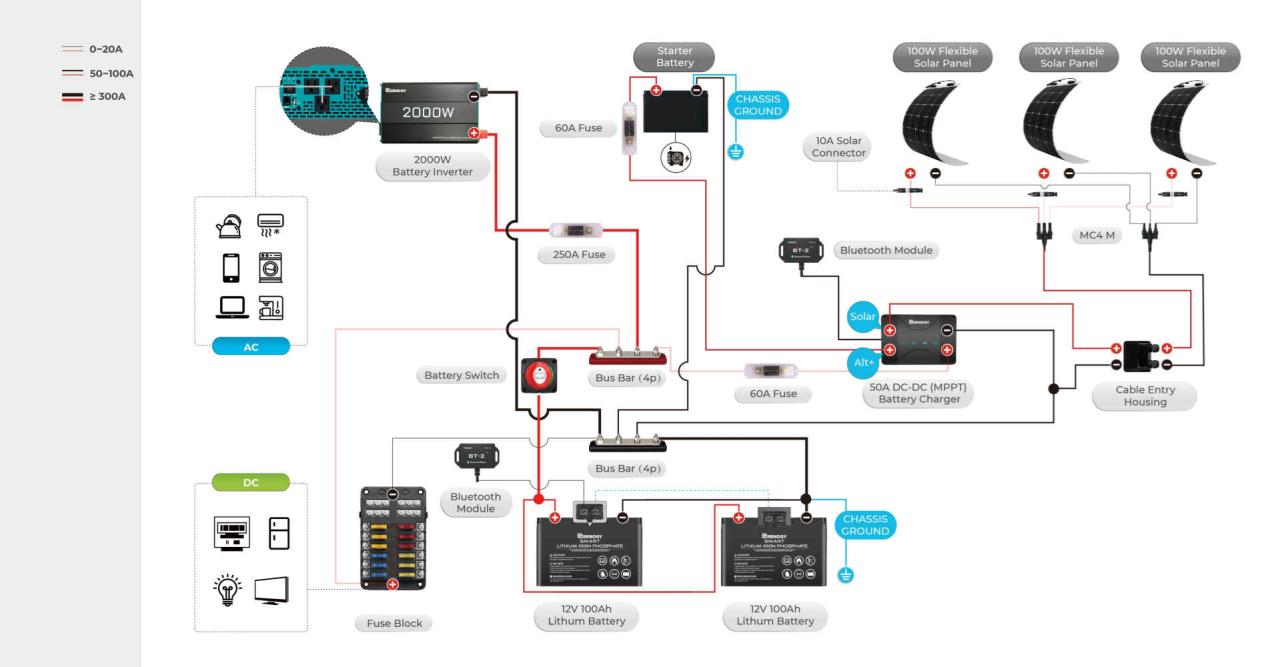
12V System Electrical Pathway Diagram
Imagine a simple diagram. We have a charging source (e.g., a converter) connected to a battery switch. From the battery switch, two lines extend. One line connects to the house battery bank, and the other (if applicable) connects to the chassis battery. From the house battery bank, multiple lines branch off, each leading to a different 12V appliance (lights, water pump, etc.).
The diagram illustrates that the battery switch is the central point controlling the power flow to the house battery bank and, therefore, the 12V appliances. A simple representation would show the charging source, a switch depicted as an open/closed gate, then the batteries, and finally the appliances. The open/closed gate representing the switch illustrates its role in controlling power flow.
Safety Precautions and Best Practices
Working with batteries, especially in a confined space like a travel trailer, requires caution. Improper handling can lead to serious injury or damage to your equipment. Understanding and following safety procedures is crucial for a safe and enjoyable RV experience. This section Artikels essential safety precautions to ensure you protect yourself and your trailer.
Proper grounding and wiring are fundamental to safe electrical operation in any vehicle, including your travel trailer. Incorrect wiring can lead to short circuits, fires, and serious injury. Ensuring all connections are secure and properly grounded minimizes these risks. Furthermore, understanding the specific voltage and amperage of your battery system is crucial for selecting the correct wiring and fuses.
Electrical Shock Prevention
Preventing electrical shocks is paramount when working with batteries and electrical systems. Always disconnect the negative (-) battery terminal first before performing any work on the system. This prevents accidental short circuits and reduces the risk of receiving a shock. Wear appropriate safety gear, such as insulated gloves and eye protection, to further minimize risk.
Before starting any work, inspect all tools and equipment for damage. Ensure your work area is well-lit and free from obstructions. Never work on electrical systems while wet or in damp conditions. This increases the risk of electrical shock significantly. If you are unsure about any aspect of the work, consult a qualified electrician.
Short Circuit Prevention
Short circuits are a significant hazard and can cause fires and damage to your electrical system. Avoid loose wires and connections. Use properly sized fuses and circuit breakers to protect your equipment. Always ensure that the battery switch is in the correct position before connecting any loads. A loose connection or a switch in the wrong position can create a short circuit, potentially leading to a fire.
So, you’re an audiophile who travels? Awesome! Check out this guide on creating the perfect audiophile travel setup for your next tropical getaway. It’s all about packing light but smart, focusing on portable, high-quality gear. Then, for a more luxurious approach, consider the tips and tricks provided in this other resource on audiophile travel aetup – it’s all about maximizing your listening experience even in the most upscale locations.
Remember to prioritize noise cancellation and durable components!
Hazards of Incorrect Battery Switch Operation
Incorrect operation of the battery switch can lead to several problems. For example, leaving the switch in the “off” position when you need power to run appliances can leave you without power. Conversely, leaving the switch on when the trailer is not in use can lead to battery drain and potential damage from parasitic loads. Furthermore, incorrectly connecting the battery switch can cause a short circuit, potentially damaging the switch itself and other electrical components.
In severe cases, this could lead to a fire. Always ensure the switch is correctly positioned before connecting any loads or leaving the trailer unattended for extended periods.
Different Battery Switch Configurations
Choosing the right battery switch configuration for your travel trailer depends heavily on your power needs and how you intend to use your trailer. A simple setup might suffice for occasional weekend trips, while extended adventures demand more sophisticated solutions. Let’s explore the common options.
Basically, you’re choosing between managing your trailer’s power using a single battery, separating your house and starting batteries, or employing more advanced systems to manage multiple batteries efficiently.
Single-Battery Systems
Single-battery systems are the simplest. Your trailer runs solely off one battery, typically a deep-cycle battery dedicated to powering the trailer’s appliances. This is straightforward and inexpensive to install. However, it leaves you vulnerable if that single battery fails, and it can drain quickly if you’re using power-hungry appliances for extended periods. This setup is generally only suitable for trailers with minimal power demands or those used for short trips.
There’s no fancy switching involved; everything runs directly off the one battery.
Dual-Battery Systems with Battery Switches
Dual-battery systems offer a significant upgrade. You’ll have two batteries: one for starting your tow vehicle and another deep-cycle battery dedicated to your trailer’s appliances. A battery switch allows you to isolate the batteries or combine them, giving you flexibility and redundancy. If one battery fails, you still have a backup. Common switch types include the simple two-position switch (both batteries together, or only the house battery), and more advanced switches that allow for charging both batteries from the tow vehicle alternator and connecting both to shore power.
This setup is ideal for most travel trailers.
Popular brands include Blue Sea Systems (e.g., their 7625 model, a popular dual-battery switch), and Perko. These companies offer switches with various features like LED indicators and different amperage ratings, which need to be matched to your battery and wiring setup.
Dual-Battery Systems with Battery Isolators
Battery isolators offer a hands-off approach to managing two batteries. Unlike a manual switch, an isolator automatically manages the charging and use of both batteries. When the vehicle’s engine is running, the isolator allows the alternator to charge both batteries. When the engine is off, the batteries are isolated, preventing the house battery from draining the starting battery.
This eliminates the need to manually switch between batteries. However, they are generally more expensive than simple battery switches. Examples of isolators include those from Sterling Power and Victron Energy.
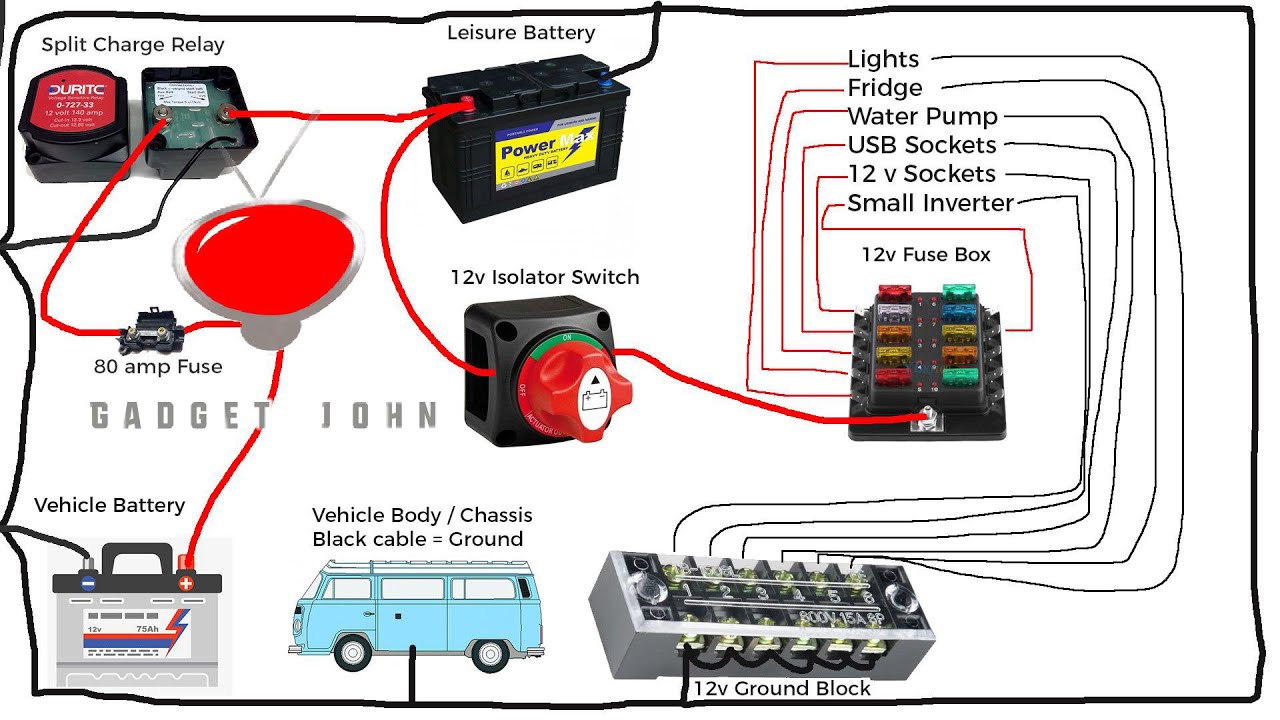
Installation of a Dual-Battery Switch (Example: Blue Sea Systems 7625)
Installing a dual-battery switch, like the Blue Sea Systems 7625, involves careful wiring and attention to safety. First, disconnect the negative terminals from both batteries. Next, run appropriately sized wiring (gauge dependent on amperage needs) from each battery to the switch. The switch’s instructions will specify which terminals to connect to each battery (positive and negative). Ensure all connections are secure and properly insulated.
Finally, connect the output of the switch to the trailer’s power distribution center. Remember to check the switch’s manual for precise wiring diagrams and safety precautions. It’s crucial to double-check all connections before reconnecting the negative battery terminals to prevent shorts or damage.
Mastering your travel trailer’s battery switch is key to a smooth and enjoyable RV experience. By understanding its function, properly connecting and disconnecting batteries, and knowing how to troubleshoot common issues, you’ll confidently manage your RV’s power, preventing costly repairs and ensuring you always have power when you need it. Remember safety first – always disconnect power before working on the system.
Happy travels!
FAQs
What happens if I leave my battery switch on all the time?
Leaving your battery switch on constantly can drain your house batteries, even when not using appliances, if there’s a parasitic draw. It’s best practice to turn it off when not using the trailer for extended periods.
How do I know which battery switch is right for my travel trailer?
The best battery switch depends on your needs. A single switch is simplest for one battery bank, while a dual switch is better for managing two separate battery banks (e.g., house and starting batteries). Consult your trailer’s manual or a qualified RV technician for advice.
My battery switch is making a clicking sound. What’s wrong?
A clicking sound often indicates a faulty switch, low battery voltage, or a blown fuse. Check your fuses and battery voltage first. If the problem persists, replace the switch.
Can I use jumper cables to start my travel trailer if the house battery is dead?
Generally, no. Starting your trailer from a vehicle’s battery could damage the electrical system. Use a dedicated jump starter or charge the house battery directly.
